I use MQTT in my home lab to connect different Home Lab services like ESPHome, Home Assistant, Node Red, etc. It’s great because it’s a light-weight way to decouple these services, but by default there’s no security. I can’t prevent a sensor from manipulating another sensor’s data, I can’t prevent somebody who has network access from monitoring messages.
In this post, I’m going to walk through enabling TLS with usernames and passwords or mTLS (Mutual TLS) using cert-manager. Cert-manager supports a mechanism to generate self-signed CA certs that I will use.
(Pre-req) MQTT Broker
I’m using Mosquitto as my MQTT broker and will assume you already have it setup. Additionally, you’ll need to have the ability to edit the configuration files. I created a Kubernetes PVC and mounted it.
 1
 2
 3
 4
 5
 6
 7
 8
 9
10
11
12
13
14
15
16
17
18
19
20
21
22
23
24
25
26
27
28
29
30
31
32
33
34
35
36
37
38
39
40
41
42
43
44
45
46
47
48
49
50
51
52
53
54
55
56
57
58
59
60
61
62
63
64
65
66
67
68
69
70
| apiVersion: apps/v1
kind: Deployment
metadata:
name: mqtt-broker
namespace: smarthome
spec:
replicas: 1
strategy:
rollingUpdate:
maxSurge: 0%
maxUnavailable: 100%
type: RollingUpdate
selector:
matchLabels:
workload.user.cattle.io/workloadselector: deployment-smarthome-mqtt-broker
template:
metadata:
labels:
workload.user.cattle.io/workloadselector: deployment-smarthome-mqtt-broker
spec:
containers:
- image: eclipse-mosquitto:2.0.18-openssl
imagePullPolicy: IfNotPresent
name: mqtt-broker
resources:
limits:
memory: 16Mi
requests:
cpu: 5m
memory: 16Mi
terminationMessagePath: /dev/termination-log
terminationMessagePolicy: File
volumeMounts:
- mountPath: /mosquitto/config/
name: config
readOnly: true
# Side-car will trigger Mosquitto to reload when the config changes
# No need to restart the entire pod.
- env:
- name: CONFIG_DIR
value: >-
/config/mosquitto.conf,/config/acl.conf,/config/passwd
- name: PROCESS_NAME
value: mosquitto
image: ajacques/config-reloader-sidecar:latest
imagePullPolicy: IfNotPresent
name: config-reloader
resources:
limits:
memory: 16Mi
requests:
memory: 16Mi
securityContext:
allowPrivilegeEscalation: false
capabilities:
add:
- KILL
drop:
- ALL
privileged: false
readOnlyRootFilesystem: true
runAsNonRoot: false
volumeMounts:
- mountPath: /config/
name: config
readOnly: true
volumes:
- name: config
persistentVolumeClaim:
claimName: mqtt-broker
|
Setting up the private CA
First step is to create a root certificate that will serve as the trusted root store
 1
 2
 3
 4
 5
 6
 7
 8
 9
10
11
12
13
14
15
16
17
18
19
20
21
22
23
24
| apiVersion: cert-manager.io/v1
kind: Issuer
metadata:
name: smarthome-ca
spec:
selfSigned: {}
---
apiVersion: cert-manager.io/v1
kind: Certificate
metadata:
name: smarthome-ca-cert
namespace: smarthome
spec:
commonName: homelab-ca
duration: 87600h0m0s
isCA: true
issuerRef:
group: cert-manager.io
kind: Issuer
name: smarthome-ca
privateKey:
algorithm: ECDSA
size: 256
secretName: root-secret
|
CA Signer
Next step is to create a cert-manager Issuer that will sign certificates using the root CA created above:
1
2
3
4
5
6
7
8
| apiVersion: cert-manager.io/v1
kind: Issuer
metadata:
name: smarthome-issuer
namespace: smarthome
spec:
ca:
secretName: root-secret
|
MQTT Server Certificate
Next step is to create a certificate for the MQTT server. Note that I include both the external and internal Kubernetes DNS names as a Subject Alternate Name. This ensures that the certificate will validate both inside the cluster and outside.
 1
 2
 3
 4
 5
 6
 7
 8
 9
10
11
12
13
14
15
16
17
18
19
20
| apiVersion: cert-manager.io/v1
kind: Certificate
metadata:
name: mqtt-server
namespace: smarthome
spec:
commonName: mqtt.example.com
dnsNames:
# Include the internal domain name too if
# services are directly connecting to it
- mqtt.example.com
- mqtt-headless.smarthome.svc.cluster.local
issuerRef:
group: cert-manager.io
kind: Issuer
name: smarthome-issuer
privateKey:
algorithm: ECDSA
size: 256
secretName: mqtt-server-cert
|
Configuring the server
Right now, the MQTT broker is going to have all these identities, but is going to do nothing with them. Combining this with some authorization rules using ACLs will enable us to control what topics each device can read from and write to.
 1
 2
 3
 4
 5
 6
 7
 8
 9
10
11
12
13
14
15
16
17
18
19
20
21
22
23
24
25
26
27
28
29
30
31
32
33
34
35
36
37
38
39
40
41
42
43
44
45
46
47
48
49
50
51
52
53
54
55
56
57
58
59
60
61
62
63
64
65
66
67
68
69
70
71
72
73
74
75
76
| apiVersion: apps/v1
kind: Deployment
metadata:
name: mqtt-broker
namespace: smarthome
spec:
replicas: 1
selector:
matchLabels:
workload.user.cattle.io/workloadselector: deployment-smarthome-mqtt-broker
template:
metadata:
labels:
workload.user.cattle.io/workloadselector: deployment-smarthome-mqtt-broker
spec:
containers:
- image: eclipse-mosquitto:2.0.18-openssl
imagePullPolicy: IfNotPresent
name: mqtt-broker
resources:
limits:
memory: 16Mi
requests:
cpu: 5m
memory: 16Mi
terminationMessagePath: /dev/termination-log
terminationMessagePolicy: File
volumeMounts:
- mountPath: /mosquitto/config/
name: config
readOnly: true
+ - mountPath: /ssl/cert
+ name: ssl
+ readOnly: true
- env:
- name: CONFIG_DIR
- value: /config/mosquitto.conf,/config/acl.conf,/config/passwd
+ value: /config/mosquitto.conf,/config/acl.conf,/config/passwd,/ssl/tls.key,/ssl/tls.crt
- name: PROCESS_NAME
value: mosquitto
image: ajacques/config-reloader-sidecar:latest
imagePullPolicy: IfNotPresent
name: config-reloader
resources:
limits:
memory: 16Mi
requests:
memory: 16Mi
securityContext:
allowPrivilegeEscalation: false
capabilities:
add:
- KILL
drop:
- ALL
privileged: false
readOnlyRootFilesystem: true
runAsNonRoot: false
terminationMessagePath: /dev/termination-log
terminationMessagePolicy: File
volumeMounts:
- mountPath: /config/
name: config
readOnly: true
+ - mountPath: /ssl
+ name: ssl
+ readOnly: true
volumes:
- name: config
persistentVolumeClaim:
claimName: mqtt-broker
+ - name: ssl
+ secret:
+ defaultMode: 420
+ optional: false
+ secretName: mqtt-server-cert
|
To start, we have a mosquitto.conf that looks like the below. It means that anybody can connect on port 1883 with no auth.
1
2
3
4
5
6
| log_dest stdout
log_type notice
per_listener_settings true
listener 1883
allow_anonymous true
|
I’ll add a new port that requires authentication. The first port requires username and passwords (Make sure to create a passwd file if you want this.) Some devices, like esp devices running esphome don’t have great support for mTLS, so I have to use usernames.
1
2
3
4
| # TLS but with usernames and passwords
listener 8882
tls_version tlsv1.2
password_file /mosquitto/config/passwd
|
The next port requires mTLS for all connections. This will be added in parallel so I can slowly move devices over:
1
2
3
4
5
6
7
8
| # Mutual TLS - Encryption
listener 8883
tls_version tlsv1.2
require_certificate true
use_identity_as_username true
cafile /ssl/cert/ca.crt
certfile /ssl/cert/tls.crt
keyfile /ssl/cert/tls.key
|
Configuring ACLs
In the server configuration, we need to add:
1
2
3
4
5
| listener 8882
+acl_file /mosquitto/config/acl.conf
listener 8883
+acl_file /mosquitto/config/acl.conf
|
You can read more about the ACL file format here. My file looks like this. By default authenticated devices are able to read and write to their own device topic. Each authenticated device has a username. For username/password, it’s obviously the username and for mTLS it comes from the CN in the subject (You can see an example in the Usage section below.)
This first section gives a default. All devices have access to their own topics ({device}/{sensor_name}) and their equivalent Home Assistant discovery topics (homeassistant/{domain}/{device}/{sensor_name}). This is implemented with the %u username placeholder. Most of my devices are running esphome so this works well.
1
2
3
| pattern readwrite esphome/discover/%u
pattern readwrite %u/#
pattern readwrite homeassistant/+/%u/#
|
Some clients need different privileges because they aren’t esp devices. For example, my control software needs higher privileges. My Node-Red service can consume anything and write to anything (I should restrict this more) and my AppDaemon has some access.
1
2
3
4
5
6
7
| user node-red
topic read #
topic write #
user appdaemon
topic read #
topic write homeassistant/#
|
Place this acl.conf in the same folder as the configuration file.
Usage
MQTT Client Certificates
Repeat this step for as many clients that you have.
 1
 2
 3
 4
 5
 6
 7
 8
 9
10
11
12
13
14
15
| apiVersion: cert-manager.io/v1
kind: Certificate
metadata:
name: mqtt-{clientname}
namespace: smarthome
spec:
commonName: {clientname}
issuerRef:
group: cert-manager.io
kind: Issuer
name: smarthome-issuer
privateKey:
algorithm: ECDSA
size: 256
secretName: mqtt-{clientname}-cert
|
This certificate can then be mounted into any Kubernetes pod and used.
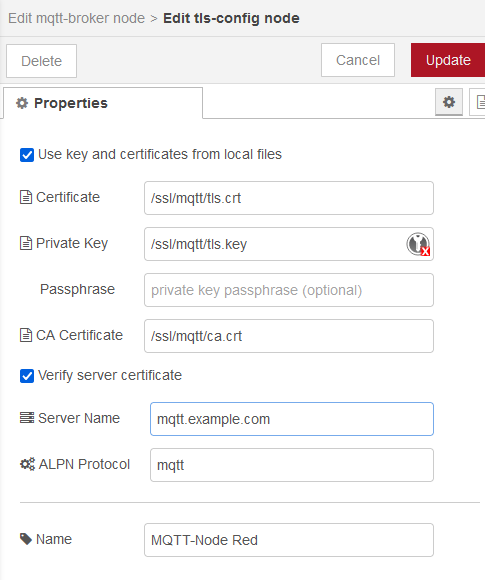
Node-Red example
For example, in Node-Red I’ll do:
 1
 2
 3
 4
 5
 6
 7
 8
 9
10
11
12
13
14
15
16
17
18
19
| apiVersion: apps/v1
kind: Deployment
metadata:
name: hass-node-red
namespace: smarthome
spec:
spec:
containers:
name: node-red
volumeMounts:
+ - mountPath: /ssl/mqtt
+ name: mqtt-ssl
+ readOnly: true
volumes:
+ - name: mqtt-ssl
+ secret:
+ defaultMode: 420
+ optional: false
+ secretName: mqtt-node-red-cert
|
And configured in the UI to use this here:

ESPHome
As of the time of writing this, I didn’t have great luck with mTLS on my esp32 devices. First, I had to extend the lifetime of the certificates so I didn’t have to reflash devices every time they expired. It was also hard to get it to verify the Host identity too because the mqtt.certificate_authority field is only available on platform: esp-idf, and not all my device configurations worked with this (e.g. NeoPixels didn’t work with platform: esp-idf).
Usernames
However, it does support have support for username/passwords. In the above configuration, I add a password listener on port 8882, so this can be done using:
1
2
3
4
5
| mqtt:
broker: mqtt.home.ajacqu.es
port: 8882
username: {myusername}
password: {mypassword}
|
To enable CA verification on esp32 and esp-idf devices, we need to import the certificate authority which is available in the ca.crt key of the Secret generated by cert-manager.
Either copy the ca.crt value out of the secret that cert-manager generates, or inject it into ESPHome:
 1
 2
 3
 4
 5
 6
 7
 8
 9
10
11
12
13
14
15
16
17
18
19
20
21
22
23
24
25
26
27
28
29
30
31
32
33
34
35
36
37
38
| apiVersion: apps/v1
kind: Deployment
metadata:
name: esphome
namespace: smarthome
spec:
spec:
containers:
- name: main
volumeMounts:
- mountPath: /config
name: data
- mountPath: /config/.esphome/build
name: tempfolder
subPath: build
- mountPath: /config/.esphome/platformio
name: tempfolder
subPath: platformio
- mountPath: /config/.esphome/external_components
name: tempfolder
subPath: external_components
+ - mountPath: /config/ssl-ca.crt
+ name: tls-cert
+ readOnly: true
+ subPath: ca.crt
volumes:
- hostPath:
path: /tmp/k8s-esphome/
type: DirectoryOrCreate
name: tempfolder
- name: data
persistentVolumeClaim:
claimName: esphome2
+ - name: tls-cert
+ secret:
+ defaultMode: 420
+ optional: false
+ secretName: mqtt-server-cert
|
Then use it in any device:
1
2
3
4
5
6
| mqtt:
broker: mqtt.example.com
port: 8882
username: xyz
password: abc
certificate_authority: !include ssl-ca.crt
|
Conclusion
Unfortunately, I went through this exercise and don’t have a great story for mTLS on the ESPHome devices which is an important use case, but I did get it working on my internal services, the ones that have higher privileges anyway.
Comments
To give feedback, send an email to adam [at] this website url.
Donate
If you've found these posts helpful and would like to support this work directly, your contribution would be appreciated and enable me to dedicate more time to creating future posts. Thank you for joining me!