I have several projects running in my Home Lab that now have to store and use sensitive secrets. In my Self-hosted finances series, I developed software to scrape my own bank statements (more on that coming soon.) In other projects, I store API keys to manage DNS or even my dedicated servers.
These applications all run in Kubernetes, which does support Secrets, however, by default, they are not encrypted and are easily accessible to actors that have access to the K8s API.
It supports encryption at rest using a static encryption key or KMS plugin, which is fine, but I wanted to try out Hashicorp Vault which stored the decryption keys in memory only, so if somebody were to get access to my server (say by breaking into my house and stealing my server), they wouldn’t get access to all my secrets.
Pre-requisites
This post assumes that you have a working Kubernetes cluster.
Installation into Kubernetes
Instead of duplicating the guides that already exist, I recommend following this guide: https://developer.hashicorp.com/vault/tutorials/kubernetes/kubernetes-raft-deployment-guide
The plan
In my cluster, I have two actors:
- Various Kubernetes pods - limited read/write to different buckets
- Me - full admin access
Configure an Auth Method
Authentication Methods are the way actors like you or your services authenticate with Vault. Combined with policies, it defines what actions are allowed to be performed.
We’ll have two auth methods (mapping to the above actors):
- Kubernetes
- userpass
Create an admin policy
Let’s create a basic admin policy that will be assigned to yourself with full permissions. This policy has full admin access so it should only be used by trusted actors.
In the Vault UI, go to Policies > Create ACL Policy. Name it admin or similar and click create.
| |
User/Password
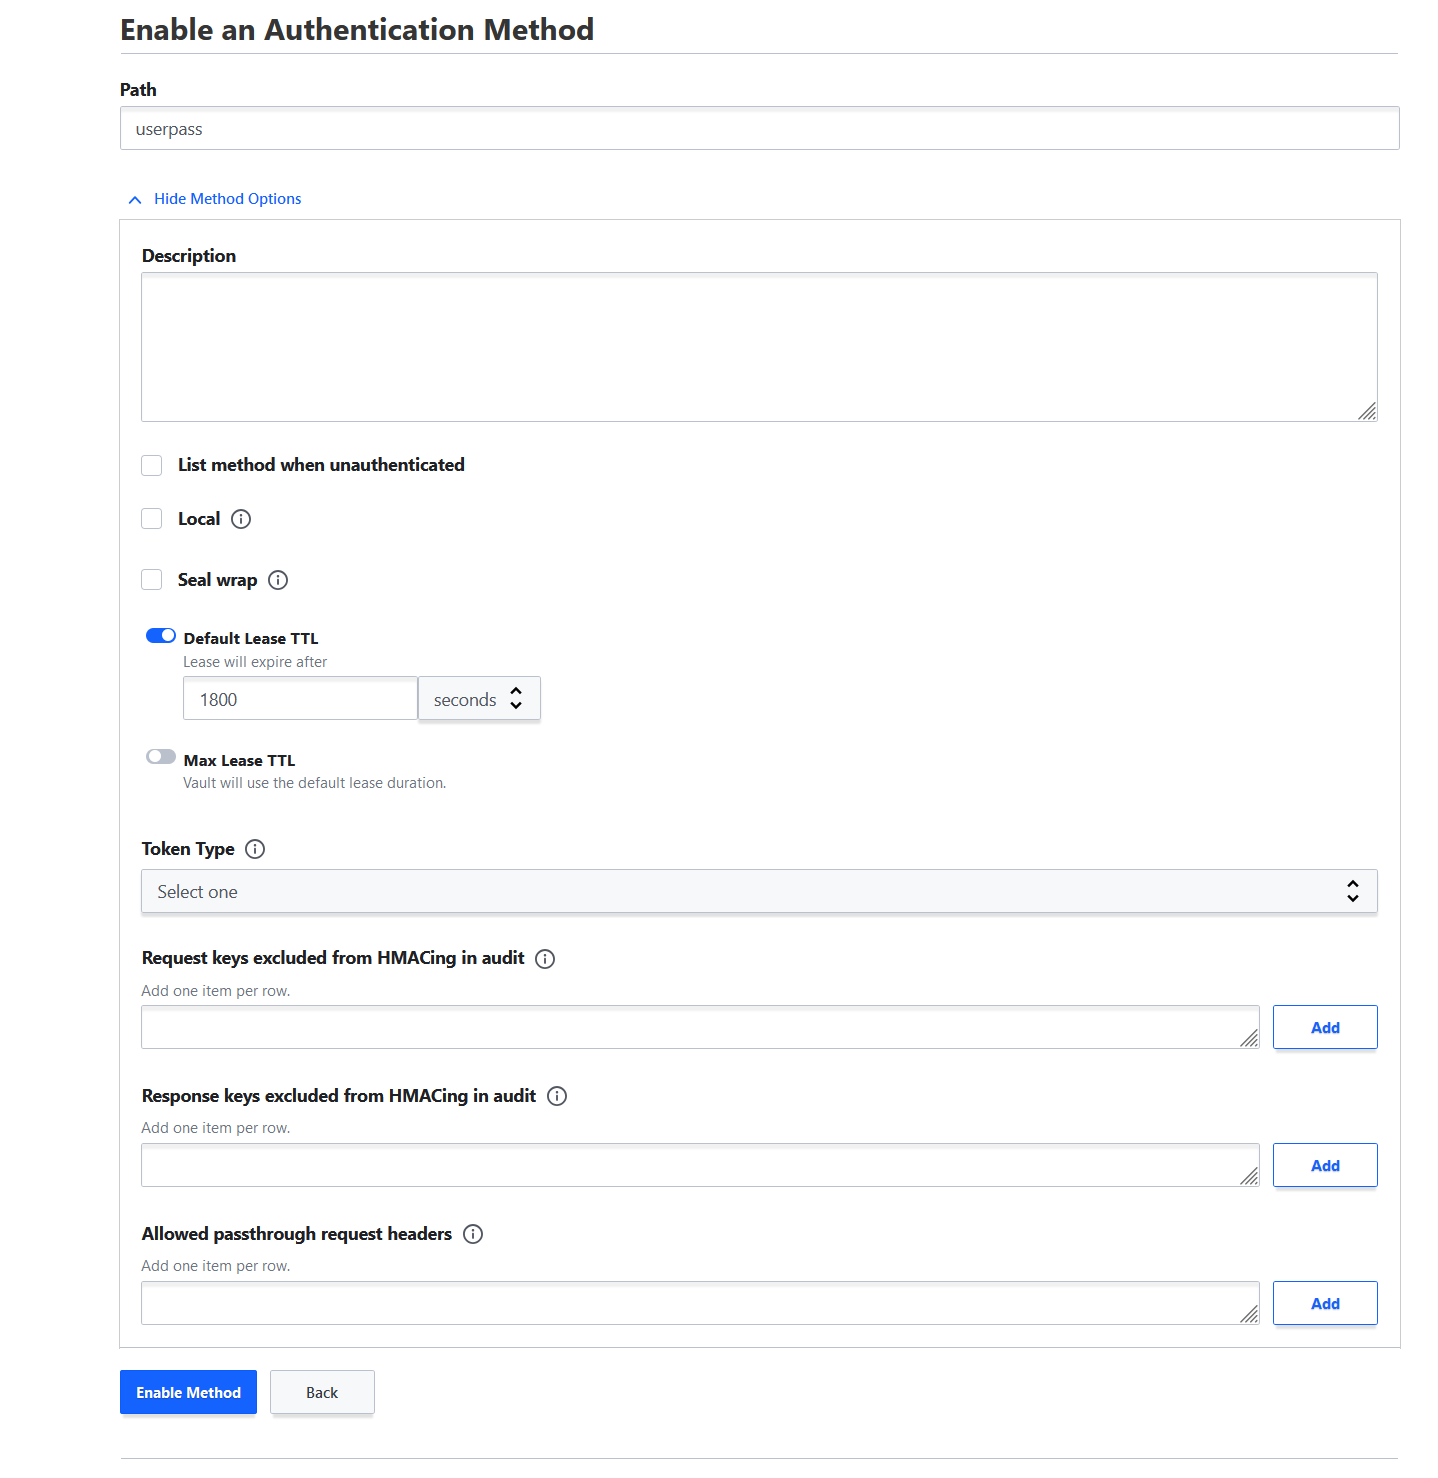
It’s not a good practice to log in using the root key every time, so we’re going to create a username/password to use instead. To be pragmatic, I still have the root key because I know I’m going to need to make a change eventually. If this were a business, I’d lock it in a safe or destroy it.


I recommend enabling a Lease TTL which will cause the session to automatically expire.

Then create a user and attach the admin policy to the user.
Kubernetes Auth Method
The Kubernetes Auth method defines how Kubernetes pods will authenticate to the Vault server and be able to receive and update credentials. Create the Kubernetes auth method.
Then configure it to point to your apiserver. For example, the Kubernetes host might be https://10.43.0.1:443/ and the Kubernetes CA Certificate can be retrieved using:
| |

Getting application specific
Now that Vault is setup, we need to create the resources that pods will use. This will get into application specific configuration so you might do this one or more times. Vault uses the term engine to describe something where secrets are stored or vended. There’s a few different types, but for storing API keys, username/passwords to my accounts, a KV or (key-value) storage should be used. Create a KV engine and name it something meaningful for your application. For example, financialcreds.
Create the Vault Policies
Next, we need a policy that allows services to access it (we already have access through the admin policy).
Go back to Policies > Create ACL Policy and create a policy like below. Note how the path only gives access to the engine. You can also do something like foobar/baz/* to give access to a folder
| |
Create Vault Roles
In Vault, a role maps the Kubernetes System Account to the list of Vault policies and permissions, and ultimately the secrets that the pod can access. Some useful configuration to specify:
- Name: Role name. This will be used in your code later
- Bound service account names: The name of the Kubernetes SystemAccount resource
- Bound service account namespaces: The namespace(s) where the SystemAccount exists
- Generated Token’s Maximum TTL: (optional) Sets the maximum lifetime the token lives for. This ensures that if a token leaks from a short-term job, it can’t be used for long. For my periodic scheduled sync jobs, I use 30m so credentials expire after 30 minutes.
- Generated Token’s Policies: Specify the policies that this role has access to. Add the policy you just created in the previous section (not the admin one).
- Generated Token’s Type: (optional) Vault docs
Using it in practice
If you did everything right, you should be able to run a job that authenticates to Vault and grabs a secret.
First we need a ServiceAccount with a matching name in the Vault role. Make sure to set automountServiceAccountToken: true.
| |
Then update the CronJob, Deployment, etc.
| |
And some Python sample code to login and read:
| |
Conclusion
We didn’t do anything store anything in Vault yet, but just setup the basics. In my future posts, I’ll be showing how I leverage Vault to manage my financial scraping.
