I’ve been running my own mail server for well over ten years now. It’s pretty old, so it’s hard to make changes to it, but it’s running in Kubernetes. I was using a mixture of Postfix, OpenDKIM, OpenDMARC, and Amavis for spam filtering with SpamAssasin, but it wasn’t very good at catching spam. Instead, its time move to rspamd. It’s much newer and encapsulates DKIM, DMARC, DNS based blacklisting, bayesian filtering, etc. all in one single tool.
Here’s my notes on migrating, what it took to get it going and some tweaks I made.
Setup Redis/Valkey
Rspamd uses Redis to store runtime stats and config. Deploy it using Helm, or manually. I’m going to assume it’s deployed in the mail namespace with a service named called rspamd-redis.
Rspamd Configuration
I started with a basic configuration defined below. Starting with this meant I could skip the quick start guide that mandated that I run the rspamadm configwizard command, though you might have some slightly different needs
| |
Then deployed rspamd like this:
| |
Then in postfix, I remove all the existing filters and use only rspamd:
| |
DNS Blocklisting
Upon starting rspamd, I get a bunch of warnings like this:
| |
It filters email, but still lets through a lot of obvious spam. This happens because rspamd queries several DNS-based block-list providers, like Spamhaus, to identify which IP addresses commonly send spam and reject them. But providers, like Spamhaus, have a free-tier and paid tiers and chose to block public DNS servers because public DNS servers anonymize the source for queries and Spamhaus is unable to limit traffic. I’m a very low-volume mail receiver, so the free tier is fine.
My server was just using the default DNS server provided by my dedicated server provider, OVH, which they considered to be a public resolver. Thus every query was being rejected.

To fix this, I’m going to have to change my resolver to not use a public resolver and instead use a resolver that does not use a public resolver. Instead, I’ll use a resolving DNS server, one that sends queries directly to Spamhaus, i.e. a recursive resolving DNS server. I just needed a simple containerized server. CoreDNS, which I normally use, did not support recursive DNS queries without an external plugin. Instead, I came across unbound which natively did.
Configuration
The following is the configuration I used. The server is configured to forward queries for .cluster.local. to the Kubernetes internal kube-dns instance. This is required because rspamd needs to connect to other Kubernetes services, such as Redis.
Additionally, we must allow all DNS blocklist domains to return internal IP addresses via the private-domain configuration option. This is critical because DNS-based block lists commonly use A DNS queries that return IP addresses to signal what action a mail server should take. For example, Spamhaus returns 127.0.0.2 when a request is on a specific filter list (other responses.) Without this configuration, unbound would discard all responses.
| |
Switch to unbound
Next, we need to start the DNS server. I added it as a side-car container with the existing Rspamd service and configured the pod’s dnsConfig to unbound.
| |
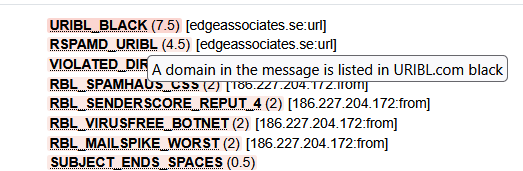
After restarting Rspamd, it started using the DNS block lists and was able to flag even more obvious spam.
Conclusion
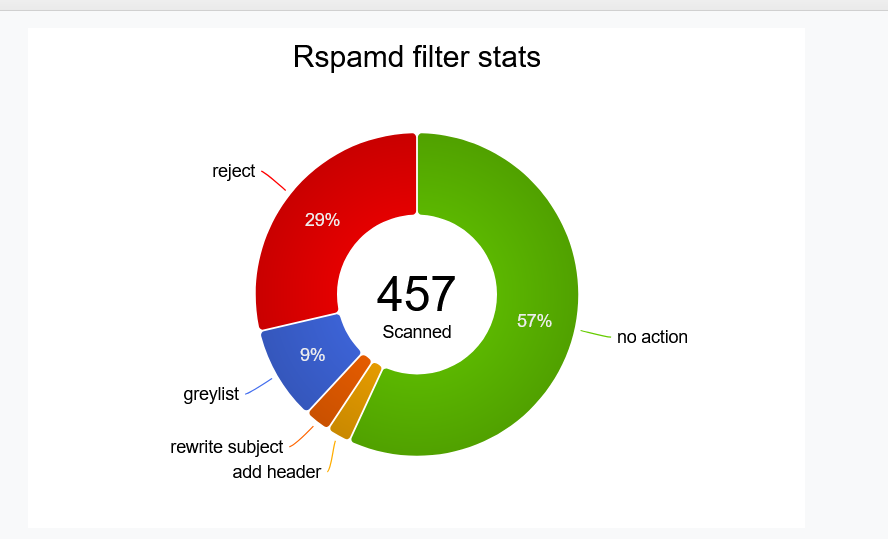
Migrating to rspamd from my previous solution was a great idea. It consolidated and reduced the services I had to run and it actually helped cut down on the spam that made it through with better rules. The UI was very easy to investigate what emails were being marked and why.
My previous solution based on Amavis and SpamAssassin was a black-box and it was difficult to understand what’s going on without digging through logs.